


NIS+ Tables and Information
This chapter describes the structure of NIS+ tables and provides a brief overview of how they can be set up.
Note - NIS+ might not be supported in a future release. Tools to aid the migration from NIS+ to LDAP are available in the Solaris 9 operating environment (see Part V). For more information, visit http://www.sun.com/directory/nisplus/transition.html.
NIS+ Table Structure
NIS+ stores a wide variety of network information in tables. NIS+ tables provide several features not found in simple text files or maps. They have a column-entry structure, they accept search paths, they can be linked together, and they can be set up in several different ways. NIS+ provides 16 preconfigured system tables, and you can also create your own tables. Table 10-1 lists the preconfigured NIS+ tables.
Table 10-1 NIS+ Tables
Table | Information in the Table |
|---|---|
hosts | Network address and host name of every machine in the domain |
bootparams | Location of the root, swap, and dump partition of every diskless client in the domain |
passwd | Password information about every user in the domain |
cred | Credentials for principals who belong to the domain |
group | The group name, group password, group ID, and members of every UNIX group in the domain |
netgroup | The netgroups to which machines and users in the domain may belong |
mail_aliases | Information about the mail aliases of users in the domain |
timezone | The time zone of every machine in the domain |
networks | The networks in the domain and their canonical names |
netmasks | The networks in the domain and their associated netmasks |
ethers | The Ethernet address of every machine in the domain |
services | The names of IP services used in the domain and their port numbers |
protocols | The list of IP protocols used in the domain |
RPC | The RPC program numbers for RPC services available in the domain |
auto_home | The location of all user's home directories in the domain |
auto_master | Automounter map information |
Because it contains only information related to NIS+ security, the Cred table, is described in Chapter 12, Administering NIS+ Credentials.
These tables store a wide variety of information, ranging from user names to Internet services. Most of this information is generated during a setup or configuration procedure. For instance, an entry in the passwd table is created when a user account is set up. An entry in the hosts table is created when a machine is added to the network. And an entry in the networks table is created when a new network is set up.
Since this information is generated from such a wide field of operations, much of it is beyond the scope of this manual. However, as a convenience, Chapter 23, Information in NIS+ Tables summarizes the information contained in each column of the tables, providing details only when necessary to keep things from getting confusing, such as when distinguishing groups from NIS+ groups and netgroups. For thorough explanations of the information, consult Solaris system and network administration manuals.
Note - You can create more automounter maps for a domain, but be sure to store them as NIS+ tables and list them in the auto_master table. When creating additional automount maps to supplement auto_master (which is created for you), the column names must key and value. For more information about the automounter consult books about the automounter or books that describe the NFS file system.
Note - As a naming service, NIS+ tables are designed to store references to objects, not the objects themselves. For this reason, NIS+ does not support tables with large entries. If a table contains excessively large entries, rpc.nisd may fail.
Columns and Entries
Although NIS+ tables store different types of information, they all have the same underlying structure; they are each made up of rows and columns (the rows are called "entries" or "entry objects"):
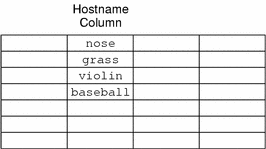
A client can access information by a key, or by any column that is searchable. For example, to find the network address of a machine named baseball, a client could look through the hostname column until it found baseball.
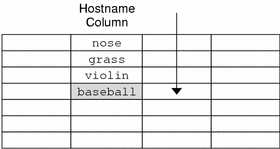
It then would move along the baseball entry to find its network address:
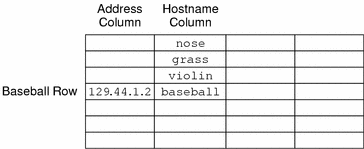
Because a client can access table information at any level, NIS+ provides security mechanisms for all three levels. For instance, an administrator could assign read rights to everyone for a table at the object level, modify rights to the owner at the column level, and modify rights to the group at the entry level. Details about table security are provided in Chapter 15, Administering NIS+ Access Rights.
Search Paths
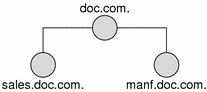
A table contains information only about its local domain. For instance, tables in the doc.com. domain contain information only about the users, clients, and services of the doc.com. domain. The tables in the sales.doc.com. domain store information only about the users, clients, and services of the sales.doc.com. domain. And so on.
If a client in one domain tries to find information that is stored in another domain, it has to provide a fully qualified name. As described in "NIS_PATH Environment Variable" if the NIS_PATH environment variable is set up properly, the NIS+ service will do this automatically.
Every NIS+ table can also specify a search path that a server will follow when looking for information. The search path is an ordered list of NIS+ tables, separated by colons:
table:table:table... |
The table names in the search path don't have to be fully qualified; they can be expanded just like names entered at the command line. When a server cannot find information in its local table, it returns the table's search path to the client. The client uses that path to look for the information in every table named in the search path, in order, until it finds the information or runs out of names.
Here is an example that demonstrates the benefit of search paths. Assume the following domain hierarchy:
The hosts tables of the lower two domains have the following contents:
Table 10-2 Example Hosts Table
sales.doc.com. |
| manf.doc.com. |
|
|---|---|---|---|
127.0.0.1 | localhost | 127.0.0.1 | localhost |
111.22.3.22 | luna | 123.45.6.1 | sirius |
111.22.3.24 | phoebus | 123.45.6.112 | rigel |
111.22.3.25 | europa | 123.45.6.90 | antares |
111.22.3.27 | ganymede | 123.45.6.101 | polaris |
111.22.3.28 | mailhost | 123.45.6.79 | mailhost |
Assume now that a user logged onto the luna machine in the sales.doc.com. domain wants to log in remotely to another client. Without providing a fully qualified name, that user can only remotely log on to five machines: localhost, phoebus, europa, ganymede, and the mailhost.
Now assume that the search path of the hosts table in the sales.doc.com. domain listed the hosts table from the manf.doc.com. domain:
hosts.org_dir.manf.doc.com. |
Now a user in the sales.doc.com. domain can enter something like rlogin sirius, and the NIS+ server will find it. It will first look for sirius in the local domain, but when it does not find a match, it will look in the manf.doc.com. domain. How does the client know how to find the manf.doc.com. domain? As described in Chapter 2, NIS+: An Introduction, the information is stored in its directory cache. If it is not stored in its directory cache, the client will obtain the information by following the process described in Chapter 2, NIS+: An Introduction.
There is a slight drawback, though, to specifying a search path. If the user were to enter an incorrect name, such as rlogin luba (rather than "luna"), the server would need to look through three tables--instead of just one--before returning an error message. If you set up search paths throughout the namespace, an operation may end up searching through the tables in 10 domains instead of just 2 or 3. Another drawback is a performance loss from having many clients contact more than one set of servers when they need to access NIS+ tables.
You should also be aware that since "mailhost" is often used as an alias, when trying to find information about a specific mailhost, you should use its fully qualified name (for example, mailhost.sales.doc.com.), or NIS+ will return all the mailhosts it finds in all the domains it searches through.
You can specify a table's search path by using the -p option to the nistbladm command, as described in "The nistbladm Command".
Ways to Set Up Tables
Setting up NIS+ tables involves three or four tasks:
Creating the org_dir directory
Creating the system tables
Creating non-system tables (optional)
Populating the tables with information
As described in "NIS+ Files and Directories", NIS+ system tables are stored under an org_dir directory. So, before you can create any tables, you must create the org_dir directory that will hold them. You can do this in three ways.
Use the nisserver script. The nisserver script creates the appropriate directories and a full set of system tables. Running the nisserver script is the recommended method.
Use the nismkdir command. The nismkdir command simply creates the directory.
Use the /usr/lib/nis/nissetup utility. The nissetup utility creates the org_dir and groups_dir directories and a full set of system tables.
The nisserver script and the nissetup and nismkdir utilities are described in "The nismkdir Command". Additional information on the nismkdir command can be found in "The nismkdir Command".
A benefit of the nissetup utility is its capability to assign the proper access rights to the tables of a domain whose servers are running in NIS-compatibility mode. When entered with the -Y flag, it assigns read permissions to the nobody class of the objects it creates, allowing NIS clients, who are unauthenticated, to get information from the domain's NIS+ tables.
The 16 NIS+ system tables and the type of information they store are described in Chapter 10, NIS+ Tables and Information. To create them, you could use one of the three ways mentioned above. The nistbladm utility also creates and modifies NIS+ tables. You could conceivably create all the tables in a namespace with the nistbladm command, but you would have to type much more and you would have to know the correct column names and access rights. A much easier way is to use the nisserver script.
To create a non-system table--that is, a table that has not been preconfigured by NIS+--use the nistbladm command. (Note that if you are creating additional automount maps, the first column must be named key and the second column named value.)
You can populate NIS+ tables in three ways: from NIS maps, from ASCII files (such as /etc files), and manually.
If you are upgrading from the NIS service, you already have most of your network information stored in NIS maps. You don't have to re-enter this information manually into NIS+ tables. You can transfer it automatically with the nispopulate script or the nisaddent utility.
If you are not using another network information service, but maintain network data in a set of /etc files, you don't have to re-enter this information, either. You can transfer it automatically, also using the nispopulate script or the nisaddent utility.
If you are setting up a network for the first time, you may not have much network information stored anywhere. In that case, you'll need to first get the information and then enter it manually into the NIS+ tables. You can do this with the nistbladm command. You can also do it by entering all the information for a particular table into an input file--which is essentially the same as an /etc file--and then transferring the contents of the file with the nispopulate script or the nisaddent utility.