


Installing With Custom JumpStart (Examples)
This chapter provides an example of setting up and installing Solaris software by using a custom JumpStart installation.
Sample Site Setup
Figure 27-1 shows the site setup for this example.
Figure 27-1 Sample Site Setup
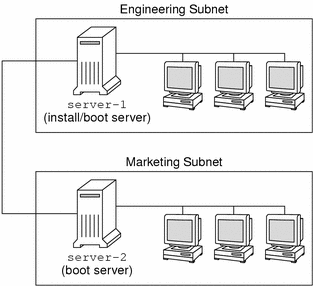
At this sample site, the conditions are as follows:
The engineering group is located on its own subnet. This group uses systems for software development.
The marketing group is located on its own subnet. This group uses systems for running word processors, spreadsheets, and other office productivity tools.
The site uses NIS. The Ethernet addresses, IP addresses, and host names of the systems are preconfigured in the NIS maps. The subnet mask, date and time, and geographic region for the site are also preconfigured in the NIS maps.
Note - The peripheral devices for the marketing systems are preconfigured in the sysidcfg file.
Both the engineering and marketing systems are to be installed with Solaris 9 software from the network.
Create an Install Server
Because the groups need to install Solaris 9 software from the network, you make server-1 an install server for both groups. You use the setup_install_server(1M) command to copy the images to the server-1 local disk (in the /export/install directory). Copy the images from the Solaris 9 Software CDs and the Solaris 9 Languages CD or from the Solaris 9 DVD.
You must copy the image from the disc to an empty directory, in these examples the sparc_9directory.
Example 27-1 Copying the Solaris 9 CDs
Insert the Solaris 9 Software 1 of 2 CD in the CD-ROM drive that is attached to server-1 and type the following commands:
server-1# mkdir -p /export/install/sparc_9 server-1# cd /CD_mount_point/Solaris_9/Tools server-1# ./setup_install_server /export/install/sparc_9 |
Insert the Solaris 9 Software 2 of 2 CD in the CD-ROM drive that is attached to server-1 and type the following commands:
server-1# cd /CD_mount_point/Solaris_9/Tools server-1# ./add_to_install_server /export/install/sparc_9 |
Insert the Solaris 9 Languages CD in the CD-ROM drive that is attached to server-1 and type the following commands:
server-1# cd /CD_mount_point/Solaris_9/Tools server-1# ./add_to_install_server /export/install/sparc_9 |
Example 27-2 Copying the Solaris 9 DVD
Insert the Solaris 9 DVD in the DVD-ROM drive that is attached to server-1 and type the following commands:
server-1# mkdir -p /export/install/sparc_9 server-1# cd /DVD_mount_point/Solaris_9/Tools server-1# ./setup_install_server /export/install/sparc_9 |
Create a Boot Server for Marketing Systems
Systems cannot boot from an install server on a different subnet, so you make server-2 a boot server on the marketing group's subnet. You use the setup_install_server(1M) command to copy the boot software from the Solaris 9 DVD or the Solaris 9 Software 1 of 2 CD to the server-2 local disk (in the /export/boot directory).
If you insert the Solaris 9 Software 1 of 2 CD in the CD-ROM drive that is attached to server-2, type the following command:
server-2# cd /CD_mount_point/Solaris_9/Tools server-2# ./setup_install_server -b /export/boot |
If you insert the Solaris 9 DVD in the DVD-ROM drive that is attached to server-2, type the following command:
server-2# cd /DVD_mount_point/Solaris_9/Tools server-2# ./setup_install_server -b /export/boot |
In the setup_install_server command, -b specifies that setup_install_server is to copy the boot information to the directory that is named /export/boot.
Create a JumpStart Directory
Now that you have the install server and boot server set up, you create a JumpStart directory on server-1. You can use any system on the network. This directory holds files that are required for a custom JumpStart installation of Solaris software. You set up this directory by copying the sample directory from the Solaris 9 DVD image or from the Solaris 9 Software 1 of 2 CD image that has been copied to /export/install:
server-1# mkdir /jumpstart server-1# cp -r /export/install/sparc_9/Solaris_9/Misc/jumpstart_sample /jumpstart |
Share the JumpStart Directory
To make the rules file and profiles accessible to systems on the network, you share the /jumpstart directory. To enable the sharing of a directory, you add the following line to the /etc/dfs/dfstab file:
share -F nfs -o ro,anon=0 /jumpstart |
Then, at the command line, you type the shareall command:
server-1# shareall |
Create the Engineering Group's Profile
For the engineering systems, you create a file that is named eng_prof in the /jumpstart directory. The eng_prof file contains the following entries, which define the Solaris 9 software to be installed on systems in the engineering group:
install_type initial_install1 system_type standalone2 partitioning default3 cluster SUNWCprog4 filesys any 512 swap5 |
Specifies that the installation is to be treated as an initial installation, as opposed to an upgrade.
Specifies that the engineering systems are standalone systems.
Specifies that the JumpStart software uses default disk partitioning for installing Solaris software on the engineering systems.
Specifies that the Developer System Support software group is to be installed.
Specifies that each system in the engineering group is to have 512 Mbytes of swap space.