


Solaris Live Upgrade (Overview)
This chapter describes the Solaris Live Upgrade process.
Note - This book uses the term slice, but some Solaris documentation and programs might refer to a slice as a partition.
Solaris Live Upgrade Introduction
Solaris Live Upgrade provides a method of upgrading that substantially reduces the usual service outage that is associated with an operating system upgrade. You can duplicate your current running boot environment, then while the original boot environment continues to run, you can upgrade the duplicate. Or, rather than upgrading, you can install a Web Start Flash archive on a boot environment. The original system configuration remains fully functional and unaffected by the upgrade or installation of a Web Start Flash archive. The duplicate boot environment is then activated to become the active boot environment when the system is rebooted. If a failure occurs, you have a safety net. You can quickly revert to the original boot environment with a simple reboot, thereby eliminating the downtime associated with the normal test and evaluation process.
Solaris Live Upgrade enables you to create copies of a boot environment without affecting the currently running system to do the following:
Upgrade a system
Change the disk configuration on the new boot environment to different file system types, sizes, and layouts
Maintain numerous boot environments with different images. For example, you can create a boot environment that contains current patches and create a boot environment that contains an Update release.
Some understanding of basic system administration is necessary before using Solaris Live Upgrade. For background information on system administration tasks such as managing file systems, mounting, booting, and managing swap, see the System Administration Guide: Basic Administration.
Solaris Live Upgrade Process
The following is an overview of the tasks necessary to create an inactive boot environment, upgrade it, and switch it to become the active boot environment.
Creating a Boot Environment Overview
Creating a boot environment provides a method of copying critical file systems from an active boot environment to a new boot environment. The disk is reorganized if necessary, file systems are customized, and the critical file systems are copied to the new boot environment.
File Systems Overview
Solaris Live Upgrade distinguishes between two file system types: critical file systems and shareable file systems. Critical file systems are required by the Solaris operating environment and are separate mount points in the vfstab of the active and inactive boot environments. Examples are root (/), /usr, /var, or /opt. These file systems are always copied from the source to the inactive boot environment. Critical file systems are sometimes referred to as non-shareable. Shareable file systems are user-defined files such as /export that contain the same mount point in the vfstab in both the active and inactive boot environments. Therefore, updating shared files in the active boot environment also updates data in the inactive boot environment. When you create a new boot environment, shareable file systems are shared by default. But you can specify a destination slice and then the file systems are copied. For more detailed information on shareable file systems, see "Guidelines for Selecting Slices for Shareable File Systems".
Swap is a special circumstance of a shareable file system. Like a shareable file system, all swap slices are shared by default. But if you specify a destination directory for swap, the swap slice is copied. You achieve this goal by using the character user interface or at the command line by using lucreate(1M) with the -m option. A limitation to splitting and merging swap slices is that the swap slice cannot be in use by any boot environment except the current boot environment or if the -s option is used, the source boot environment. The boot environment creation fails if the swap slice is being used by any other boot environment, whether the slice contains a swap, ufs, or any other file system. A swap slice is not required. For procedures on reconfiguring swap, see the procedure, "To Create a Boot Environment (Character Interface)" Step 9, or "To Create a Boot Environment and Reconfigure Swap (Command-Line Interface)".
Note - When you create file systems for a boot environment, the rules are identical to the rules for creating file systems for the Solaris operating environment. Solaris Live Upgrade cannot prevent you from making invalid configurations on critical file systems. For example, you could enter a lucreate command that would create separate file systems for root (/) and /kernel--an invalid division of root (/).
Copying File Systems
Creating a new boot environment entails copying critical file systems to another slice. The disk may need to be prepared before you create the new boot environment. Check the disk to make sure it is formatted properly:
Identify slices large enough to hold the file systems to be copied
Identify file systems that contain directories that you want to share between boot environments rather than copy. If you want a directory to be shared, you need to create a new boot environment where the directory is split off to a slice where it becomes a file system. From that point on, this new slice can be shared with future boot environments. For more information on creating separate file systems for sharing, see "Guidelines for Selecting Slices for Shareable File Systems".
The process of creating a new boot environment begins by identifying an unused slice where the critical file systems can be copied. If a slice is not available or a slice does not meet the minimum requirements, you need to format a new slice. For the procedure on formatting a slice from menus, see the procedure, "To Create a Boot Environment (Character Interface)" Step 6.
After the slice is defined, you can reconfigure the file systems on the new boot environment before the file systems are copied into the directories. You reconfigure file systems by splitting and merging them, which provides a simple way of editing the vfstab to connect and disconnect file system directories. You can merge file systems into their parent directories by specifying the same mount point, or you can split file systems from their parent directories by specifying different mount points.
For procedures on splitting and merging file systems, see the following procedures:
"To Create a Boot Environment (Character Interface)" Step 8 or Step 7
"To Create a Boot Environment and Split File Systems (Command-Line Interface)"
"To Create a Boot Environment and Merge File Systems (Command-Line Interface)"
After file systems are configured on the inactive boot environment, you begin the automatic copy. Critical file systems are copied to the designated directories. Shareable file systems are not copied, but are shared (unless you have designated some file systems to be copied). When the file systems are copied from the active to the inactive boot environment, the files are directed to the newly defined directories and the active boot environment is not changed in any way. For procedures on creating a new boot environment, see "Creating a New Boot Environment".
The following figures illustrate various ways of creating new boot environments.
Figure 30-1 shows the critical file system root (/) that has been copied to another slice on a disk to create a new boot environment. The active boot environment contains root (/) on one slice. The new boot environment is an exact duplicate with root (/) on a new slice. The file systems /swap and /export/home are shared by the active and inactive boot environments.
Figure 30-1 Creating an Inactive Boot Environment -- Copying root (/) to root (/)
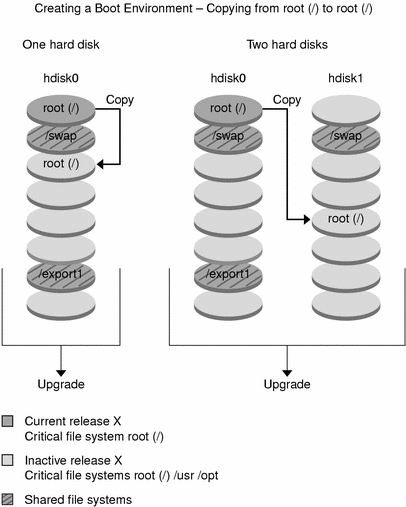
Figure 30-2 shows critical file systems that have been split and copied to slices on a disk to create a new boot environment. The active boot environment contains root (/) on one slice. On that slice, root (/) contains the /usr, /var, and /opt directories. In the new boot environment, root (/) is split and /usr and /opt are put on separate slices. The file systems /swap and /export/home are shared by both boot environments.
Figure 30-2 Creating an Inactive Boot Environment -- Splitting File Systems
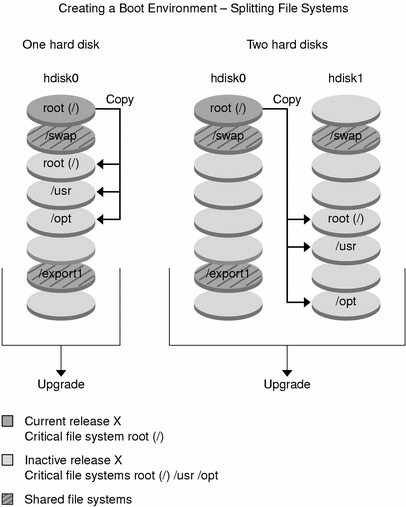
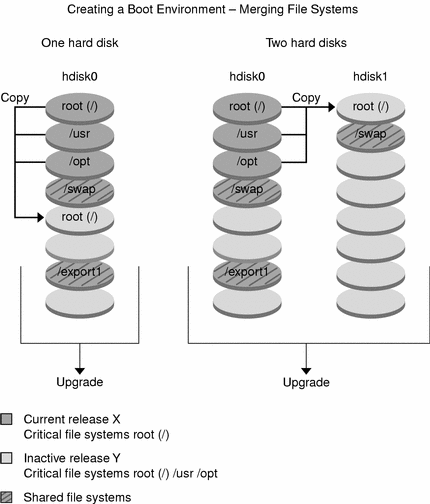
Figure 30-3 shows critical file systems that have been merged and copied to slices on a disk to create a new boot environment. The active boot environment contains root (/), /usr, /var, and /opt each on their own slice. In the new boot environment, /usr and /opt are merged into root (/) on one slice. The file systems /swap and /export/home are shared by both boot environments.
Figure 30-3 Creating an Inactive Boot Environment -- Merging File Systems
Upgrading a Boot Environment Overview
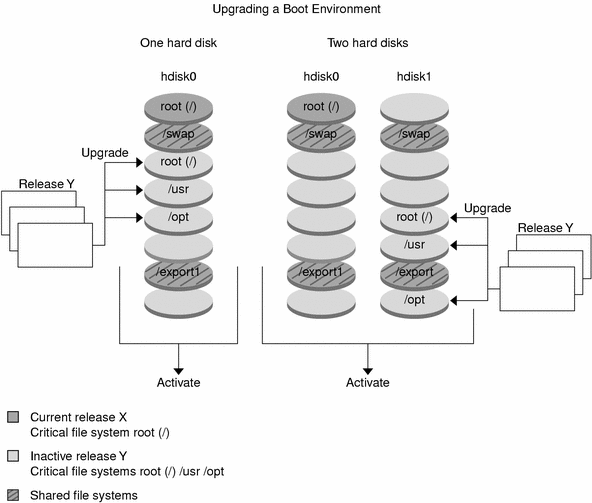
After you have created a boot environment, it remains unchanged until you are ready to upgrade it. You can perform an upgrade on the boot environment at any time. The upgrade does not affect any files in the active boot environment. When you are ready, you then activate to the new release. Figure 30-4 shows an upgrade to an inactive boot environment. For procedures on upgrading a boot environment, see Chapter 33, Upgrading With Solaris Live Upgrade (Tasks).
Figure 30-4 Upgrading an Inactive Boot Environment
Rather than an upgrade, you can install a Web Start Flash archive on a boot environment. The Web Start Flash installation feature enables you to create a single reference installation of the Solaris operating environment on a system that is called the master system. Then you can replicate that installation on a number of systems that are called clone systems. In this situation, the inactive boot environment is a clone. For more information about the Web Start Flash installation feature, see Chapter 16, Web Start Flash Installation Feature (Topics).
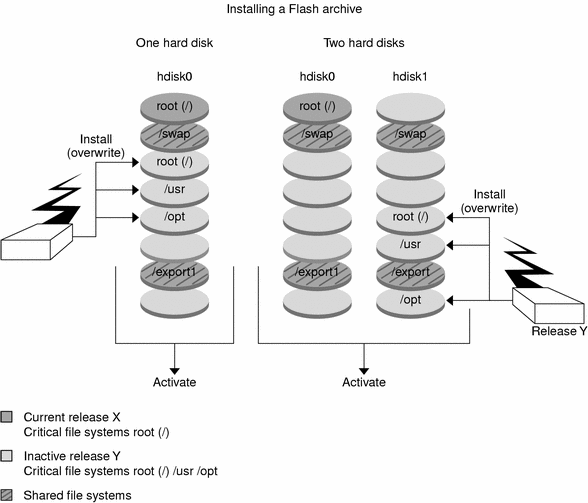
When you install the Web Start Flash archive on a system, the archive replaces all the files on the existing boot environment as an initial installation would. Figure 30-5 shows an installation of a Web Start Flash archive on an inactive boot environment. For procedures on installing a Web Start Flash archive, see "Installing Web Start Flash Archives on a Boot Environment".
Figure 30-5 Installing a Web Start Flash Archive
Activating a Boot Environment Overview
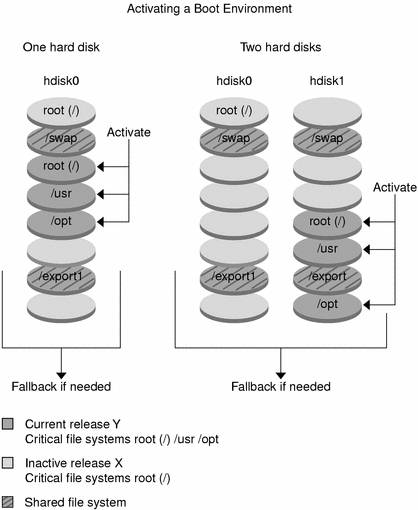
When you are ready to switch and make the new boot environment active, you simply activate the new boot environment and reboot. Activating the new boot environment modifies it to make it bootable. Files are synchronized between boot environments the first time you boot a newly created boot environment. "Synchronize" here means that certain system files and directories are copied from the last-active boot environment to the boot environment being booted. When you reboot the system, the configuration that you installed on the new boot environment is active. The original boot environment then becomes an inactive boot environment. Figure 30-6 shows a switch after a reboot from an inactive to an active boot environment. For procedures on activating a boot environment, see "Activating a Boot Environment".
Figure 30-6 Activating an Inactive Boot Environment
Fall Back to the Original Boot Environment Overview
If a failure occurs, you can quickly fall back to the original boot environment with an activation and reboot. You need to fall back if the new boot environment cannot be booted, or if the new environment boots but does not work completely, or you are not satisfied with the results.
The use of fallback takes only the time to reboot the system which if far quicker than backing up and restoring the original. The new boot environment that failed to boot is preserved and the failure can be analyzed. You can only fall back to the boot environment that was used by luactivate to activate the new boot environment.
You fall back to the previous boot environment the following ways:
If new boot environment boots successfully, but you are not happy with the results, you simply run the luactivate command with the name of the previous boot environment and reboot.
If the new boot environment does not boot, you boot the fallback boot environment in single-user mode and run the luactivate command and reboot.
If you cannot boot in single-user mode, you must boot from media or a net installation image, mount the root (/) file system on the fallback boot environment, run the luactivate command and reboot.
For procedures to fallback, see "Failure Recovery: Falling Back to the Original Boot Environment (Command-Line Interface)".
Figure 30-7 shows the switch that is made when you reboot to fallback.
Figure 30-7 Fallback to the Original Boot Environment
