


Using Solaris Live Upgrade to Create a Boot Environment (Tasks)
This chapter explains how to install Solaris Live Upgrade, use the menus, and to create a boot environment. This chapter contains the following sections:
"Task Map: Installing Solaris Live Upgrade and Creating Boot Environments"
"Starting and Stopping Solaris Live Upgrade (Character Interface)"
About Solaris Live Upgrade Interfaces
You can run Solaris Live Upgrade with a character user interface (CUI) or the command-line interface (CLI). The content and sequence of instructions for the CUI and CLI are generally the same. Procedures for both the CUI and CLI are provided in the following sections. The CUI does not provide access to all features of Solaris Live Upgrade. See Chapter 36, Solaris Live Upgrade (Command Reference) for a list of commands and also see the appropriate, associated man pages, which more fully document features.
The CUI does not run in multibyte and 8-bit locales.
Using Solaris Live Upgrade Menus
Figure 32-1 Solaris Live Upgrade Main Menu
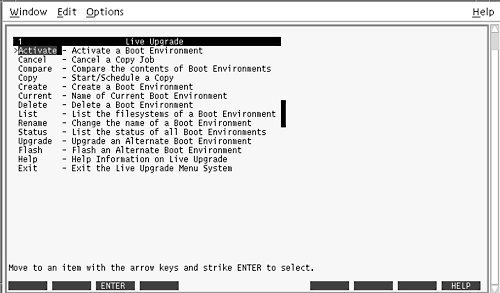
Navigation through the menus of the Solaris Live Upgrade character user interface requires that you use arrow keys and function keys. Use arrow keys to navigate up and down before making a selection or to place the cursor in a field. To perform a task, use the function keys. At the bottom of the menu, you see black rectangles that represent function keys on the keyboard. The first black rectangle represents F1, the second F2, and so on. Rectangles that are active contain a word that represents a task such as Save. The Configuration menu notes the function key number plus the task, rather than a rectangle.
F3 is always SAVE and completes the task for that menu.
F6 is always CANCEL and exits the menu without saving changes.
Other function keys' tasks vary, depending on the menu.
If your function keys do not properly map to the function keys on the Solaris Live Upgrade menus, use Control-F plus the appropriate number when you are asked to press a function key in the following procedures.
Task Map: Installing Solaris Live Upgrade and Creating Boot Environments
Table 32-1 Task Map: Using Solaris Live Upgrade
Task | Description | For Instructions |
|---|---|---|
Install Solaris Live Upgrade packages | Install packages on your Solaris 2.6, Solaris 7, or Solaris 8 operating environment | |
Start Solaris Live Upgrade | Start the Solaris Live Upgrade main menu | "Starting and Stopping Solaris Live Upgrade (Character Interface)" |
Create a boot environment | Copy and reconfigure file systems to an inactive boot environment |
Installing Solaris Live Upgrade
If you are upgrading from a Solaris 2.6, Solaris 7, or Solaris 8 operating environment, you need to install the Solaris Live Upgrade packages on your current operating environment.
 To Install Solaris Live Upgrade
Insert the Solaris 9 DVD or Solaris 9 Software 2 of 2 CD.
Run the installer for the media you are using.
If you are using the Solaris 9 DVD, change directories to the installer and run the installer.
# cd /cdrom/cdrom0/Solaris_9/Tool/Installers
# ./liveupgrade20
The Solaris Web Start installer displays.
If you are using the Solaris 9 Software 2 of 2 CD, run the installer.
% ./installer
The Solaris Web Start installer displays.
From the Select Type of Install panel, click Custom.
On the Locale Selection panel, click the language to be installed.
Choose the software to install.
For DVD, on the Component Selection panel, click Next to install the packages.
For CD, On the Product Selection panel, click Default Install for Solaris Live Upgrade and click on the other software choices to deselect them.
Follow the directions on the Solaris Web Start installer panels to install the software.
Starting and Stopping Solaris Live Upgrade (Character Interface)
This procedure starts and stops the Solaris Live Upgrade menu program.
To Start Solaris Live Upgrade Menus
Note - When viewing the character interface remotely, such as over a tip line, you might need to set the TERM environment variable to VT220. Also, when using the Common Desktop Environment (CDE), set the value of the TERM variable to dtterm, rather than xterm.
Log in as superuser.
Type:
# /usr/sbin/lu
The Solaris Live Upgrade main menu is displayed.
Figure 32-2 Solaris Live Upgrade Main Menu
To Stop Solaris Live Upgrade Menus
Creating a New Boot Environment
You can use Solaris Live Upgrade with menus or the command-line interface (CLI). Procedures are documented for both interfaces. These procedures do not exhaust the possibilities for using Solaris Live Upgrade. For more information about commands, see Chapter 36, Solaris Live Upgrade (Command Reference) and the appropriate man pages, which more fully document the CLI.
Creating a boot environment provides a method of copying critical file systems from the active boot environment to a new boot environment. The Create menu, Configuration submenu, and lucreate command enable reorganizing a disk if necessary, customizing file systems, and copying the critical file systems to the new boot environment.
Before file systems are copied to the new boot environment, they can be customized so that critical file system directories are either merged into their parent directory or split from their parent directory. User-defined (shareable) file systems are shared between boot environments by default. But shareable file systems can be copied if needed. Swap (a shareable file system) can be split and merged also. For an overview of critical and shareable file systems, see "Creating a Boot Environment Overview".
This section contains the following procedures:
"To Create a Boot Environment for the First Time (Command-Line Interface)"
"To Create a Boot Environment and Merge File Systems (Command-Line Interface)"
"To Create a Boot Environment and Split File Systems (Command-Line Interface)"
"To Create a Boot Environment and Reconfigure Swap (Command-Line Interface)"
"To Create a Boot Environment and Reconfigure Swap Using a List (Command-Line Interface)"
"To Create a Boot Environment and Copy a Shareable File System (Command-Line Interface)"
"To Create a Boot Environment From a Different Source (Command-Line Interface)"
"To Create a Boot Environment For a Flash Archive (Command-Line Interface)"